I have been working on a new idea for slab and wheel thrown forms after a request from one of my sisters. She wanted to have a lamp form that would go with her mission style furniture. After much thought, a few pages of sketches on form and variation, I decided to create large textured plate to roll a slab over.
Over the last few weeks, the plate,1/8 inch plywood, was covered with modeling paste, textured, and dried. Three coats of modeling paste in this manner and I was ready for step 2. This time I used a dremel tool on a router mount to create a series of pine needle type lines with branch areas added in. I cut the plate horizontally, getting rid of part for more interest.
This form worked to some degree, especially after spraying a bakers spray on it. This aided in the release of the slab from the form. You will notice I have nailed on two sticks of equal thickness to roll my rolling pin over. I had hoped that the design would give me a complete panel with the pine needle design indented. Not so.
In the finished slab rolled out over the form, the top is missing the border edge. The pine needle motif is coming out very well, and should not need a whole lot of work in the wet stage. I next tried pounding out the slab over the form, rolling in different directions, not rolling out the slab, pounding it down and then cutting the height of the sticks. None of the techniques gave me the crisp full border I was looking for.
At this point I believed that the problem was caused by the clay moving over the design plate when being rolled or pounded causing it to blur the border. I decided to try fully confining the slab to the plate, not allowing the clay to slide around as it got rolled or pounded into the form. This worked much better than any other attempts and with a little work will allow me to have 4 slabs to assemble and add wheel thrown parts for a jar. This preliminary form is to be a wedding jar for a good friend. A year late, sad to say.
With a little smoothing in the wet stage, and careful trimming this slab
is ready to start drying to leather hard when I will bevel the edges of
the 4 pieces to join together. I will post later as things progress.
Here is the basic box waiting for the foot ring, neck and lid. these will be wheel thrown and added on next. I have highlighted some of the decoration with white and green engobe, to help bring out the texture, and add light areas to the decoration under the glaze. The hazelnut brown clay is beautiful, but can darken glazes quite a bit.
Wednesday, May 29, 2013
Tuesday, May 28, 2013
When is a large slab like a large white canvas?
Often painters will face the fear of the first stroke on that large white canvas. What to place there, what image, realistic or abstract, or somewhere in between. It is the same at times for a potter working on the wheel or with a block or slab of clay. Should they create a functional piece, or something sculptural. Years ago, one of my painting professors said sometimes you just have to jump in with some idea where you want to go, but no real plan. There are times that I have done that on canvas, and times when it has happened to me when working with the clay.
One day I had a large slab of clay, and some idea of where I wanted to go. I had just read the Tolkien trilogy and decided to do something based on the theme: Two Towers. this started with the idea of being a fountain, and therefore would have lots of open dish type space. From there I had no idea where it would go.
As you can see from the image on the left, I had considered the need of a hole for the cord and plug of the pump to come through. The two towers had openings for hose and would actually pump the water out through the towers to slide back in to the water basin at the bottom.
After considering this piece for a while, I have concluded that I am not happy with it as a fountain, it takes up too much space, and needs to be near a wall all the time. At the same time any fountain is not practical with the cat in the house; he always wants to be in the water. I considered making it into a bird bath outside, but really don't want a lot of birds leaving their calling cards on the deck-no yard. So in the end I have decided that it will become a cactus garden. Sometimes making use of the product of the large slab is more troublesome than the idea itself. However, I like working this way with small slabs pieced together to make a larger whole. Joins are not a problem as I have become very cognizant of the scoring and slipping with compression. I also use a little "magic water" in with my slip to make it work a little better.
Sunday, May 5, 2013
Pine needles: an idea in progress
A year ago, one of my sisters asked me to make a couple of lamps for her that would use a pine needle motif of some sort. I started out thinking I could do it by carving a wooden stamp that would allow a repeated motif that I could connect with some sort of branches.
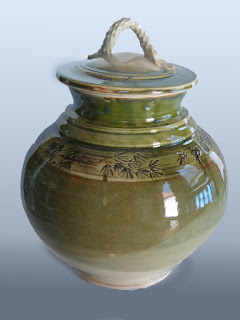
The jar at right is the first of a a series of pots that I have been working on for that stamp idea. I find that even though I like the effect on the shoulder border, it looks a little too much like bamboo instead of pine needles. This has led me to try a new tack, and presently I am working on a textured wooden section to roll slabs over for a lamp in a "mission" style. This is using modeling paste on 1/4 inch plywood.
Saturday, May 4, 2013
Darker clay body
The last time I ordered clay, I decided to try a darker body. I ordered the Hazelnut Brown from Standard Ceramics. This body has a richer brown color that show nicely where the clay is unglazed as near the bottom, and around lids. However, it will require some reworking of the glazes and the surface treatment as the glazes will all be darker over this clay.
In order to deal with this, I started using white slip over the clay in the wet stage working though it with combs. So far pleased with the effect.
I think this will also require some adjustments in the glaze colors, so this summer will be spent on a series of glaze experiments and test tiles. Hopefully I will be able to have a new look for pots by the Fall.
The two bowls here were created for the Open Bowl initiative that is run by one of the three Altoona Junior High School art teachers, Ann Bickel. I try to make a few pieces for a good cause when I can. The proceed for this goes to a local food bank, and to a JHS program for their own students.
I have been preparing chalice and paten orders for the Order of St. Luke, and have sent out half of the order. The chalice on the right is one from the recent batch with the Hazelnut Brown with white slip over top. It is glazed using Waxy white and Nutmeg, both recipes from Van Gilder. I am pleased with the texture, but feel I still need to adjust some of the glaze color.
In order to deal with this, I started using white slip over the clay in the wet stage working though it with combs. So far pleased with the effect.
Bowl of Hazelnut Brown with white slip on rim glazed in Teal Blue and Rutile Green(Van Gilder) |
I think this will also require some adjustments in the glaze colors, so this summer will be spent on a series of glaze experiments and test tiles. Hopefully I will be able to have a new look for pots by the Fall.
Bowl with same treatment as above with cut rim. |
The two bowls here were created for the Open Bowl initiative that is run by one of the three Altoona Junior High School art teachers, Ann Bickel. I try to make a few pieces for a good cause when I can. The proceed for this goes to a local food bank, and to a JHS program for their own students.
I have been preparing chalice and paten orders for the Order of St. Luke, and have sent out half of the order. The chalice on the right is one from the recent batch with the Hazelnut Brown with white slip over top. It is glazed using Waxy white and Nutmeg, both recipes from Van Gilder. I am pleased with the texture, but feel I still need to adjust some of the glaze color.
Subscribe to:
Posts (Atom)