Sunday, September 11, 2022

Shenandoah Potter's Guild Conference. . Winchester, VA


It has been a while since I was last on here, so I will take a bit of time to update.

The new L&L is running, and it is fantastic! Phone app tells me temps, and gives me warnings. 

The kiln, a E28M-3 took a while to calibrate as the witness cones were about 11/2 cones off. I am now running a -45 offset on the cone offset setting. Each level is within the cone  6-6.5 region. mostly ^6. I have it with Quad elements and the Genesis Touch Screen Controller and the downdraft venting system. Worth it, as the few loads I have fired have been pretty much flawless except for the early cone offset tuning. 
The latest news is that I recently presented a 2 day workshop at Handley High School in Winchester, VA for the Shenandoah Potters Guild. Negotiations began in the Winter, and the date was set in February or March. I had not realized that the date was set for Memorial Day weekend until two weeks before the workshop.  . I had other things on my mind. I was trying to finish up chalice and paten shipping for my yearly Hickman awards through the Order of St. Luke. Post Covid planning left us with a Disney Vacation, and a Cruise with in two and a half weeks of each other with the workshop in between the two vacations.  At any rate things have been hectic.


This is the classroom of Heather Scott, at Handley High School. It had a few Shimpo wheels that I have not thrown on in years. Pleasantly surprised with the wheels as they had sufficient torque to center larger pieces of clay, always a plus. An excellent slab roller and an extruder. Plenty of working room and AV equipment. A really nice set up, kudos to the district for supporting a quality art program!


The morning began as I had hoped, wedging clay, and getting ready. I had created a presentation using Libre Office 7.3, brought some pieces that I had kept over the years, and a selection of my personal personal tools for working with clay that included throwing tools, trimming tools, texture tools and others. The plan was to begin with an introduction, the presentation, and demonstrate throwing off of the hump, decoration while throwing and other techniques that I enjoy using. The beginning presentation did not go to plan. . . it had to be converted to a MS presentation file, and the fly ins and other effects ended up stacked one over top, , , oh well, adjust. We struggled through that and ended up on the wheel throwing and relaxing. I started with smaller pieces, a series of bowls and stems for chalices to be trimmed and assembled the next day, a honey jar, with lid and spoon. We had a break for Lunch that was pot luck by the guild. . . .Great food !
After Lunch we moved to a pitcher form along with a large bowl and a few smaller pieces. We ended the day around 5:30 or 6:00 after storing the pots and thorough clean up  


First form throwing off the hump
This is the beginning of a chalice bowl with decoration added before shaping. The texture will become larger and softer when the form is stretched to size. Opening up on the hump has become a pancake form with good compression in the center, and then the pancake pulled up to form the side walls of the pot. This helps with the alignment of clay particles in the transition from the base of the pot to the side walls minimalizing the occurrence of the ill fated S shaped crack.


Below is the bowl form in mid stride. I open up most bowls with a bamboo rib I repurposed from a bamboo cooking set. The spoon makes an excellent  throwing rib for bowl forms and I use if often.

Animated potter having fun!


Pitcher form before spout and handle
Extruding a handle

Jig for trimming chalice stems and bottles from plumbing parts
On the second day of the workshop, we started out with trimming pieces and rolling out and assembling a group project constructed of slabs. I also demonstrated some of the tools I used to help with trimming of pots and make sizing lids for the honey jars easier using off the shelf plastic plumbing parts.
Honey jar lid with spoon

Trimming a chalice stem
After throwing the bowl, and before final shaping, I threw a pitcher form, and added a handle created with the use of my electric putty gun extruder. This allowed me to demonstrate the use of that to make all sorts of small parts and handles for pots.


I also started a larger vase form, which over the day I would return to while working on other things. Not the best of timing as the form started to dry a little too quickly, ending up a little wonky, but it did survive.


We also took some time to do a group project that involved slab and wheel thrown combinations. The original idea was to create curved piece with 6 sides. 

Assembling the slabs for the group pot

However, the curve was too extreme to build with the time we had for the last day. So we improvised using 4 sides, with a thrown top and thrown bottom. This did allow me to stress that the side dimensions of the slab form had to match the inside dimensions of the thrown form at the top, and the diagonal (corner to opposite corner) had to match the outside dimensions of the thrown form where the two pieces were to be joined.. The overlapping areas were trimmed causing an arch form at the top of the pot at the shoulder. We decided on added on feet for the base instead of the thrown top.

Heather Scott HS teacher in the background

 I have to say that the Shenandoah Potters Guild treated me really well. I wish to thank Alice Boysen for choosing me to present, and all of the time she took to negotiate the presentation. She also provided me with a hotel room that allowed much needed rest at night. Many thanks also reaching out to Heather Scott, who was able to make the HS classroom available. I was very impressed with her organization and student work that I saw, very gracious and helpful the entire weekend. I would also like to thank Lin Hausknecht for forwarding me pictures she took when attending. A final thanks to   Lucinda and Jim Leaman for taking pictures and creating the video that follows. Without those folks, I would not have had a visual record of the weekend, as I got too involved to take any pictures. It was a wonderful weekend from my perspective. 


Wednesday, March 10, 2021

 Here it is 2021, and time has flown by even with the pandemic event. We have been pretty well isolated. trying to stay safe. I still am highly involved in the pottery, but met with a set back in November when my 36+ year old kiln finally reached the point of no return. I have kept it repaired over the years, but when it failed in the middle of a glaze firing I found that too many electrical components needed replacing. Considering the work and cost of parts it was determined by my wife that I should buy a new kiln. I have a new L&L with all of the bells and whistles on order since January, and should receive it by May. I hope to get back to making pots soon, as I need to clean out the old kiln and another kiln that was just too small to make room for the new one. At the same time I will need to store the half fired pieces to finish firing in the new kiln. 


Just as a teaser, I posted this sequence in a single image on Ceramic Arts Daily forum in the Fall of 2020. It shows a sequence of steps for throwing an 8# floor vase. The pictures are in order with the one on the left top showing the centered piece of clay, the top right showing the pulled but thick cylinder.


The left one here shows the cylinder that has been textured. The right image shows the textured area being shaped and further thinning of the top portion of the cylinder


The last three images here show more shaping, and refinement to the form, the thickening of the top rim and the refinement of the rim. The last image shows the bottom of the pot before trimming.


Thursday, August 8, 2019

Busy Spring and Summer

It was a busy Spring, as clay started to thaw out around mid April. I had already received an order from Savannah Bee in Georgia, and needed to finish orders for chalices and patens. Much of my time was spent in the shop trying to get orders out.

 Decorating the chalice forms has been interesting, as I am now almost always stamping them with texture before shaping the bowls, thrown of the hump. This allows some variation in the textures as the form expands so do the textures. I am still throwing the stem and the bowls separately, and often will use a potato peeler to facet edges of the stems in places. I also find the the bulge in the stem toward the top makes it much easier to hold.
The use of a trimming chuck as I have shown earlier is still by far the easiest tool to trim these tall stems without leaving a lot of marks on the form.


This year I had a request for a set of chalices and a long bread paten for french loaves. I ended up doing a slab form with a thrown top ring. The top ring was thrown on a bat without a bottom, and then added a large slab and trimmed to the oval shape of the ring. Decoration was done with the same wooden stamp as used on the chalices.

The honey jar and mug order for Savannah Bee was completed and delivered in late June, and the pieces were very welcome, as they had sold out of the pieces delivered in October.
Taken at the Savannah Bee storeroom, Savannah, GA

Rest of order during count. No breakage during transport


With all of the orders filled, it was time to complete some on my Honey Do list. My wife had been using some of my old larger jars for flower arrangements. However some of the jars were not quite right to hold large flower arrangements and she asked me to make her some floor vases.  

On the left is one of these. There was an interesting lesson learned, that I will have to remember in the future. I have been using a white base glaze over the entire form on my pots. This was because when working with the Hazelnut Brown from Standard Ceramics I was not satisfied with the color of the glazes on the bare clay. The dipping of the entire form in the base white liner allowed me a rich variation in color and brightness that did not occur over the bare clay with the sprayed on glazes. I continued to use the same technique on the 630 white clay, but over time was frustrated as the Cream Rust glaze would appear bleached out. The pot on the left was glazed inside and out with the white liner glaze, but only to the shoulder line, leaving the bottom area unglazed before spray glazing. 

Compared to the vases
Floor vase dipped in White glaze inside and out
 below where there is very little brown showing. My overglaze sprays include a Variegated Blue, and Rutile Green along with the Cream Rust.

I am not disappointed in the way the glazes turned out for these last two, as it is a matter of taste. However, a good lesson to remember.
Table vase with base white inside and out

Monday, February 18, 2019

I have been busy in the Fall of 2018 with work in the shop, and doing some work on an article that was co-authored with Madeleine Coomey. This article started with some posts on the Ceramic Arts Daily forum involving my problems with my thumb, and the use of a hand held extruder. The rest is explained in the article that I can now post. I hope that those of you that are looking for a smaller extruder, or a hand held power extruder will find this of help. It has certainly helped me with my arthritic problems.


Saturday, September 22, 2018

Still Love the Griffin Grip!

I have been busy making lids for honey jars of late, and found that trimming the flat style lid that fit into a gallery difficult with the size of the lid 23" and the handle that is a hollow globe or cone shape. After a little bit of experimenting with using cushions around the handle and the Griffin Grip holding it, or using a cup or mug held in the Griffin Grip, I finally ended up with a solution. Several folks out there would say just to throw a chuck, and then trim using the chuck to hold each lid in place. However, I have always found that the amount of clean up after using a wet chuck was too time consuming.

My solution again comes from the plumbing section of the hardware store.  The 3" reduction collar shown has a narrow 2" and a 3" diameter. Two for one so to speak. At any rate, the plastic will hold a nice damp rim from the sponge, the lid may be set in center or tapped if needed. Once center press down lightly to seal. The Griffin Grip holds the collar in place well, and I was able to use my favorite band saw flat blade to flatten the bottom of the lid, and to join on the stem thrown for the spoon for the honey jar. After removing the lid by lightly prying one edge, I use a piece of thin pipe to cut the spoon and add a drizzle hole to the back side.

Thursday, September 6, 2018

New Quick Tip in Ceramics Monthly

I had posted a tip on the Ceramic Arts Daily, Community Forum where I am a moderator. The folks at Ceramics Monthly believed it to be of value and asked me to write it up. Above is the article that appeared in the September issue.
It has been a busy Summer, and I am finishing up another order for Savannah Bee, and have orders for berry bowls, and have finished up an order for mugs at Oak Mountain Hideaway, an airbnb.
I have been doing teapots, mugs and honey jars for Savannah Bee, and will be glazing for a few weeks to deliver in October just before a long vacation trip.

Green ware waiting for firing. 
Teapot with bee on handle

Close up of handle lid area with bee

Friday, May 11, 2018

It's Official!

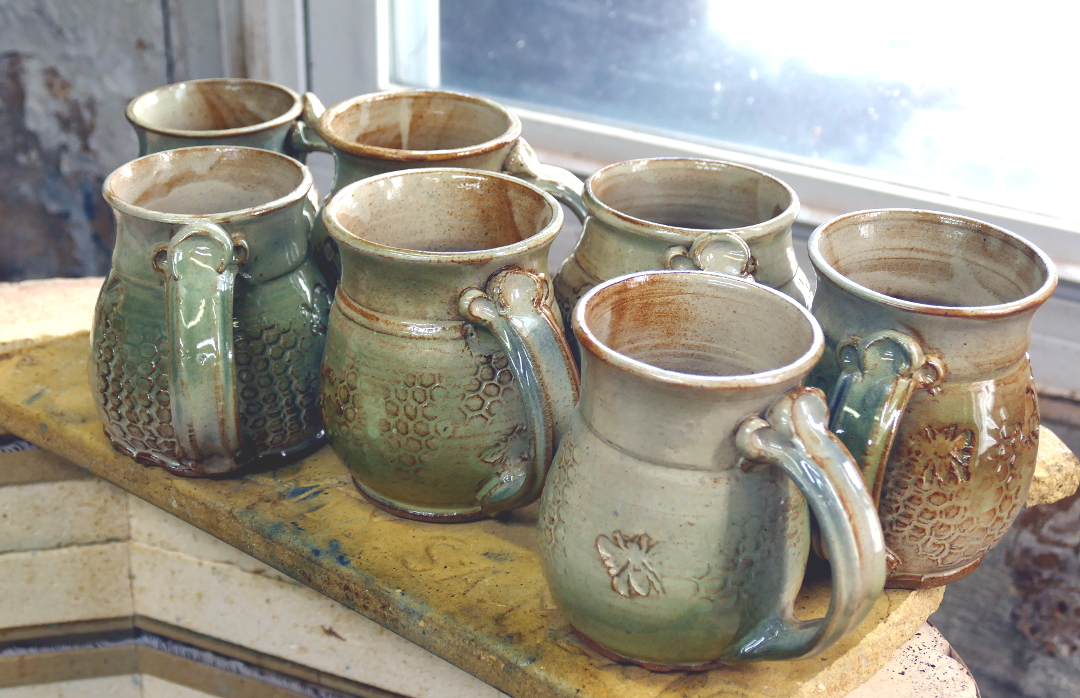
Honey jars on the left are base glazed with a white
It has a busy Spring, even though Winter seemed to hang on for way too long. I received and order for honey jars and mugs from Savannah Bee based in Savannah, GA after Christmas. This company a large honey company that makes many products using honey as a base and also sells a wide variety of honeys.
I started into production of 50 of each type of form in late March as soon as some warmer weather started up. At the same time this is the time of year for Communion sets purchased by the Order of St. Luke for graduation awards. Most of these had already been completed in the Fall, but there were several that had need of glaze firing and some that needed to be thrown.

The days of glazing after bisquefires started on the 23rd of April, and went until May 3rd to complete the order for Savannah. We packed up and were on the road that Friday, to return on Sunday. Great day on Saturday spent with my nephew. We had breakfast, and then went to one the offices of Savannah Bee to drop off the pottery, and do a little shopping in their store full of honey based products. The rest of the weekend was uneventful, but great weather, great company and food. Savannah is a foodie haven, and a walking city with lots to see.

Bisqued mugs, patens pitcher and bowl


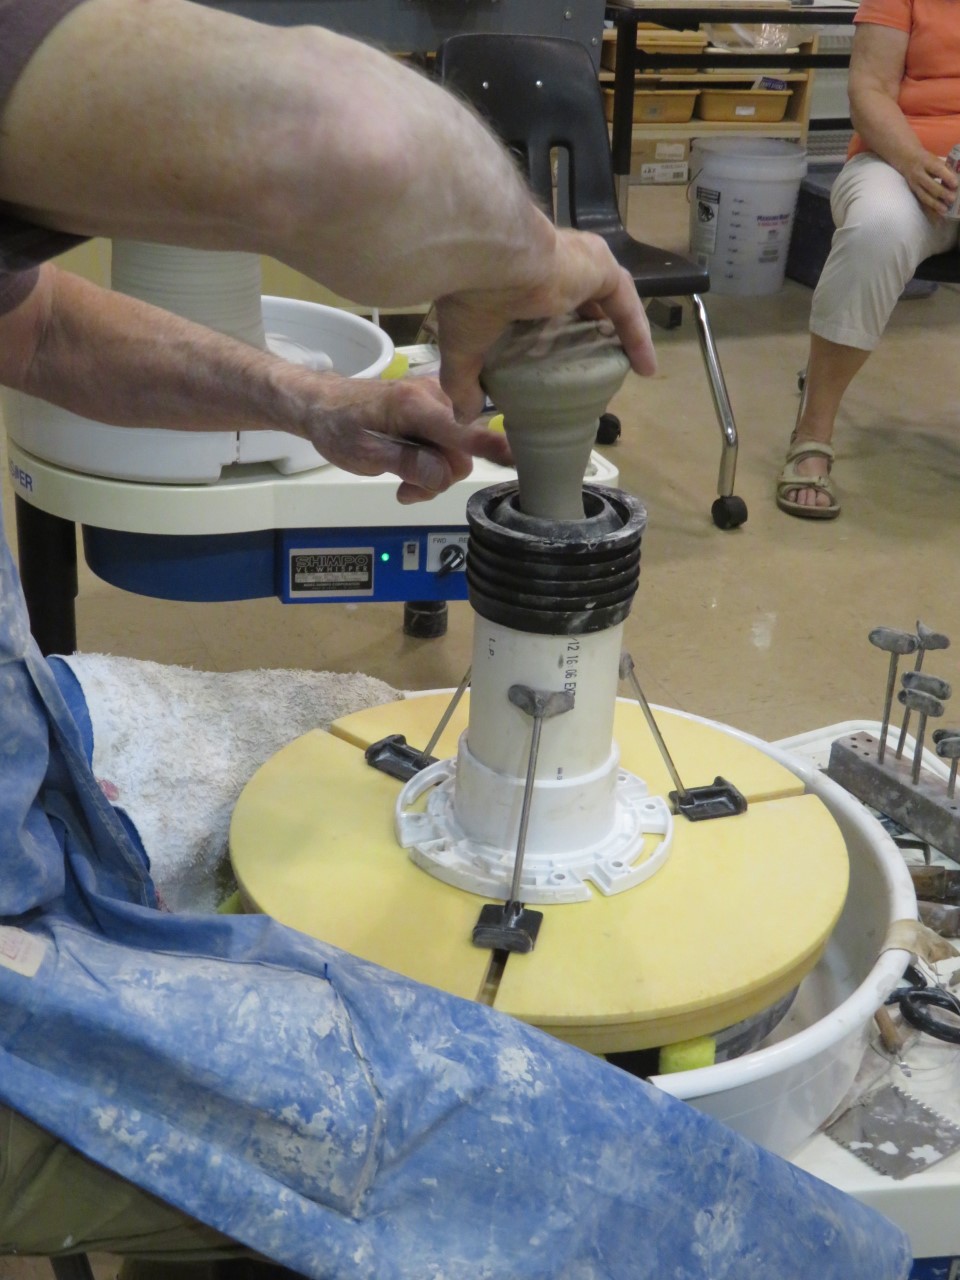
Mugs stored in kiln until bottoms are ground
The mugs on the right are ready for glazing after bisque firing. I use a base liner white, with 3 over sprayed glazes; spraying from different directions with the first two then spraying over all with a Rutile Green.
The mugs here in the kiln are waiting the grinding of the bottoms, and final quality checks.


This year I have had to make a change in some of my work habits and ethics. I used to believe my pulled handles were really nice, and that I would never do another type of handle. However, age, and the visitation or arthritis in my right thumb has made me start using extruded handles for my mugs. These handles are made with a commercial die that I modified greatly with my Dremel tool and a grinding tip.


Mugs with extruded handles


I believe if you compare the mugs on the left to my earlier posts that you will see very little difference in the handle shape. These are of the extruded type, and the older posts are of the pulled handle type.
I also believe the extruded handles to be somewhat stronger than the pulled ones.


Honey jars were part of the reason for the order from Savannah Bee as I had sent a few down to Savannah with some relatives to be delivered as proof of concept to the company.
The jar lids do not have the usual notch in the lid, as I wanted something that was more bug safe than the jars with the traditional honey stick in the jar with a notch in the lid. My lids are thrown with a hollow handle to be lighter, but with a thrown spoon with a hole in the side opposite the spoon notch to drizzle the honey onto biscuits or other food. I have been playing around with lots of different forms for this, and find this closed form to work quite well as the spoon.


You will notice in the pictures that the stem has a hole opposite of the spoon opening that allows one to tip the spoon and drizzle the honey onto the food.


The Communion Sets are given as presentation sets to new inductees into the ministry at various seminary schools across the country. This years sets have been stunning, and I am pleased to be finally sending out the last of the orders as the last load is cooling.


Patens are made larger and a little deeper to handle a
bread loaf.


Chalice and Paten


Close-up of chalice with combination of New white base,
Cream rust, and Variegated blue, with Rutile Green over spray. 


Bowl and Pitcher
Occasionally there is a need for a different type of award, and this year there was a request for a pitcher and bowl for a Deacon.


So it is official, as Pic Works pottery mugs and honey jars should become available on the shelves of Savannah Bee stores in May.