Wednesday, November 15, 2017

Making Apple bakers for a Winter dessert!

I have lately been throwing some Apple Bakers off of the hump. These are interesting forms in that they have a narrow cone in the center of a bowl. When done right they can stack in the cupboard and will hold a large apple on a stem with spices and other garnishes to be baked in either the microwave or the oven. I am diabetic, so instead of an apple dumpling, with all the dough, I fix these without sugar, just a mid sweet apple.

For the potter experienced, these are a small challenge, for a beginner a great skill builder. The pot has techniques that will help to develop the throwing double walled pots and other items like candle holders with a base bowl to catch wax drips.
Apple Baker showing center stem for cored apple to be placed over. Center stem allows for heat to cook inside of apple for more even heating.


Stacked Apple Bakers showing how the hollow stem allows for multiple stacking in the cupboard.

 Apple Baker shown with spices and butter with water into the bowl. I use 1 tablespoon of water, one teaspoon of butter, cinnamon and ginger. However, you could use any number of garnishes, like raisins or cranberries, nuts, granola, sweeteners(honey, sugar, brown sugar, maple syrup).


Teachers. .. I have no problem with you printing my guideline below to use in the classroom, or share, just don't take credit.


Thursday, October 5, 2017

Recent work August 2017


I have been working on a burial urn for a gentleman the last few months. These are particularly difficult due to the double lid fit. The idea behind the lid fit in this manner is to allow the information like name and dates to be protected by the outer when buried in a vault.
Even though glaze should hold up indefinitely, I believe the extra protection is warranted.

This particular piece is interesting because it is to be large enough to hold the ashes of his 3 dogs also. This presented a bit of a problem. . . how do you figure the volume needed for such an urn?
Thankfully, I found this link that allows one to figure the size of an urn based on the weight of the individual to be buried in it. http://www.mainelyurns.com/what-size-cremation-urn.html
So I figured the man at 200 pounds, and each dog at 100=500 pounds. The conversion utility shows this to be 500 cu. inches, or 34.6 cups of water. Easy way to judge the size of a pot after glaze firing. However, how do you figure the size before glaze firing or as a freshly thrown pot? Add the amount of shrinkage for your clay, or multiply by 1.x where x equals your clay shrinkage factor. I usually add 1-2% more above the clay shrinkage factor.. 

 I have also been playing around with berry bowls. These I have been throwing various sizes with about 2-4 pounds of clay, with a small platter/dish that starts with about 2 lb..  These are kind of fun bowls, and I have been experimenting with different pierced patterns for the water drainage openings. These are thrown with Standard Ceramics cone 6 Hazelnut Brown clay.
The glazing is done with a single dip of a white liner glaze, and a sprayed on Cream Rust, Rutile, and Variegated Blue glazes. This allows me to use some artificial and natural plant elements for decoration as a mask for the spray glazes. The white liner glaze lightens the Hazelnut Brown, but allows the texture and color underneath to show through and break over edges.


Some of the last forms in this last load included Honey Jars. Years ago, when doing Honey Jars, I thought about doing the standard jar with the hole in the lid, and the wooden swiggle to dribble on the honey. However, upon thinking more about the idea of honey, with an open hole, often having it outside with bugs, and the thought of bugs in my honey, I decided to try something different. So these are the latest in a long line of Honey Jars.
The picture at the right shows how the lid has a stem attached that acts as a spoon, with a hole in the back side to drizzle the honey out of the hole. This does present some problems for the potter, in firing, but the simplest solution for firing the lid/spoon is to fire it upside down on the pot. This works quite well.


I have also been throwing mugs a little differently as of late. These are made from thrown cylinders that have been heartily stamped with different stamps or textured materials, then shaped and finished.

Glazing again is done with the base white liner glaze and sprayed on glazes over top.


The texture on this comes from a kitchen silicone hot pad. It looks much like a honeycomb pattern, and works really well if not pressed too deeply into the cylinder as I have at times ended up creating a hole in the form because of the stretching of the texture on shaping. However, this texture becomes quite handsome the more it is stretched.
This 


Monday, June 5, 2017

Sometimes Things Just Happen

Spring found me sending out new Communion Sets and a Flagon and bowl. These are to be a graduation award for new graduates from seminary schools all over the country. One special person from each college gets the award. The schools are in the all over the country, East coast, West coast, Central, North and South.
Just as I was finishing up the last of the Communion Sets, I was approached by an very good friend to make a burial urn for her mother, whom I have known for several years. So it was back in the shop for that, which took about a 1 1/2 weeks. Talking about it in a private club to one of the managers brought another job in . . . a burial urn for him and his 3 bird dogs, still not yet finished.

However, I do have many of the pieces mentioned above for display here, beginning with the Award sets for the Seminary Schools.  I have often done bowls for this for those people in Seminary that are not going to become ministers. This is the first time I have been requested to do a flagon and a bowl.

I have also included several Communions sets, with close ups of images I believe to be of interest.Each of these is shaped and decorated and assembled individually so as to be one of a kind. All of the patens are stamped with the logo of the non profit group that contracts the commission.
Flagon and Bowl Honorary Award
Bowl with stamp for organization
Flagon(pitcher) to the bowl set.
Decoration done with commercial
rolling stamp and silicone hot pad
before shaping.

Serrated plastic rib carved from credit card around and arc

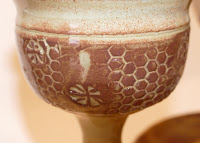
Decoration detail of chalice bowl, which was thrown off the
hump, trimmed and joined to the stem.


detail of above paten showing stamp
and decoration detail


Funerary Urn


The pieces here are using a commercial roller stamp for the decoration before shaping.


The funerary urn was thrown from seven lbs of clay with the two lids thrown off the hump for the body of the pot. The cylinder was raised, and then decorated with the commercial rolling stamp of pine needles, and a silicone kitchen hotpad with a hexagonal pattern in it.

The lid was also stamped after soft trimming with a commercial rolling stamp.
Inner lid with full name and dates for genealogical purposes
Lid to complete form, cover and protect the inner lid
.


This bowl set was created for a wife's retirement from nursing. The husband had seen some other bowl sets that I had done and asked me for a set for his wife. So again one job led to another. The bowls are shown in order, and the first is from 6# of clay for the Mixing bowl, then 4# for the large serving bowl, and 3# for the smaller bowl and the batter bowl. the flared rims and cut feet have pretty much become a signature attribute to the bowls for me.

Batter bowl for ret


The last jar is something that just happened as I was throwing all of the other jars that I have been doing. This one was from 4# of clay, including the lid. I have a tendency of throwing lids off the hump of the piece of clay I am throwing the pot with. When throwing jars, lids come first off the same clay, as with teapots, lids and spouts come first then the pot itself. This seems to keep me focused, and at the same time the clay used is of the same consistency for each piece.
As you can see from this view, the foot for the jar is carved using the brass pipe as I have been doing in many of the bowl forms. I believe this gives a more elaborate effect to the lift of the form.


Thursday, March 9, 2017

Communion Set time again. . . along with some recent bowls


Chalices                                  

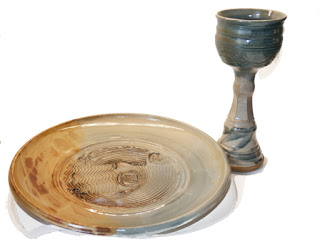
Most every year, around March, I have an order for Communion sets from a non profit organization. These are given to graduates from colleges across country pursuing a career as an ordained individual. I have been doing business with this group now since the late 70's. when my chalices were short more like goblets, and my plates were much less than they are now. I have 20 chalices to choose from for sets this year, and am in the process of throwing the plates or as others would know-patens. As communion has changed over the years, the patens now are larger to hold either a whole loaf of bread to be ceremoniously broken , or one already broken in to smaller pieces. At the same time the chalices are a little wider in bowl size than I would normally drink from to allow for Intinction from the chalice.


The past year or so, I have been experimenting with more texture on mugs, and bowls. This experimentation has led me to texturing the cylinder before shaping it. So when doing a mug, I throw the cylinder approximately the height I want the mug, then texture most of the surface with scraper,rollers or stamps of some sort. Then I shape the mug form using only my hand or a tool on the inside of the mug. Then I finish up by pulling a smooth curving lip that partially re-centers the top of the pot.
The new bowls, and chalice bowls follow the same process. I will try to include some close-ups of the chalice bowls so that you can see how the texture is working. I especially like the way the textures get larger yet softer with stretching the clay to shape it.

The logos are rubber stamped and I use it only on the orders for this organization as it is their logo.

I have not discovered a way to make the stems use the same texturing process, or the plates. However, I am happy using the texture repeat on the plate so that the two pieces match up with matching glaze color.


Bowls
The bowls are a similar situation, as they are using a silicone kitchen hot pad pressed into the cylnder after it has been thrown. It has taken a bit of experimenting on how thin to throw the cylinder before texturing as this is to be a bowl. Too extreme a texture and the bowl will end up with holes all the way through the wall, too thick a cylinder and you will have to trim too much of the texture off of the bowl.
The bowl shown here is a retirement gift for a clients wife. I was asked to put her Name and retirement dates on the bowl. This is one of 5, and is thrown of 6 pounds of clay.                                                                                                                                                                                                                                                                                            
The second bowl to the set is a 4 pound bowl that is thrown to be used as a large serving bowl. This bowl is decorated in the same style on the rim, and on the outside.

 The next bowl is a 3 pound bowl that is another part of the set and is meant for smaller serving bowl or for an individual salad.
This last bowl is a batter bowl from 3 pounds of clay also. It uses the same motif for the flared rim, and the same texture from the silicone hot pad as the others. I also curled down the rim opposite of the spout while in the wet state, for the later handle addition. After trimming, and signature the strap handle was pulled , textured, and joined to the batter bowl arching over the area where I had curled over the rim. Works very well that way and is kind of elegant.

Sunday, February 5, 2017

Thinking about better bowls

Often when throwing a bowl, I found that I was taking a long time to open up a larger bowl 10 pounds or more. While still in graduate school, I was trying to throw large bowls, struggling along until I saw a picture in a book of someone using there elbow to open up. Looked weird in the beginning, but the more I thought about it, I decided what did I have to lose? It took me a few weeks of effort to get down the process, but after wards the entire opening up with the elbow felt quite natural. The elbow is a pretty rounded area of the body, the shortening up of the arm and the bracing of the wrist of the opening arm by the unused hand seemed to give a lot of stability and control. Ever since then larger bowls, which I have been doing more of lately are much easier. Here are a sequence of videos showing the process. I think those of you with experience will recognize how controlled the opening is using the elbow.


When I first learned about throwing in college, my professor told us that there were three forms we were to be able should be able to throw. He started us with the cylinder, and I believe that most students on the wheel start with the lowly cylinder. He also stated that the three basic forms, the cylinder, the bowl and the plate were the forms from which all thrown pottery were derived. Over the years, I have read so much material discussing what made each of these forms, and how each form could be modified to do create a wide variety of functional and non functional forms. 
Cylinders seem to be the most adaptable of forms being able to adapt to forming taller forms like pitchers, vases, mugs, jars, and jugs. Lower forms of cylinders include cups, dishes, casseroles and other baking dishes. The other two forms, plates and bowls seem to be less adaptable than the cylinder. 
Bowls are a form that is often misunderstood or  What makes a good bowl? First maybe we should decide on what a bowl is defined as.
Miriam-Webster: 
Definition of Bowl
  1.  : a concave usually hemispherical vessel;

This as opposed to definition of a dish:
Definition of Dish
  1. a shallow, typically flat-bottomed container for cooking or serving food.
For this exploration of improving the bowl, I hope you can accept my Basic bowl profile as presented.

The basic bowl shape has some characteristics that have made it an excellent piece of functional pottery: the rounded curve into the bottom allows foods or liquids to pool on the bottom for removal by a spoon, the curve also is lacking corners or dead spots where flour of other materials would gather when mixing making it easier to get all ingredients mixed into the batch, and the curve can be adapted for wider or deeper bowls for a variety of uses from mixing to serving.

I have been using thrown bowls for many years in cooking at home, and find the basic shape in need of some updating. My wife and I will often use the dishwasher to clean up after big meals. Often the bowls used for preparation or serving are placed in the dishwasher leaning upside down. Upon unloading the dishwasher the bowl will often have water gathered in the base of the foot ring that drips over other ware in the dishwasher when unloading. Solutions to this problem could include changing the angle of the inside of the foot ring, or cutting the foot ring to the base of the bowl curve. Each of these methods removes the area where water gathers when the bowl is leaning upside down.
 
The first option is simple in that the inside curve of the foot ring is rounded into the base of the outside of the bowl. Thus allowing water to drain from the foot ring. This option allows for a very simple presentation, but works best for shallow foot rings as the deeper the foot ring the more extreme the curve blending into the bowl base.


The second option is much more useful for deeper foot rings and bowls with more presence on the table than the first option. Often the use of a fettling knife is used to cut away portions of the foot ring down to the bowl curve. The use of a large pipe to cut away part of the foot ring will give an elegant curve to parts of the foot ring that are left, and also allow the drainage of water. I have found this to be one of the easiest ways to cut the rim neatly.  I am sure that an experienced potter may find methods to alleviate the drainage problem, but these are two solutions that work without worry of holes filling with glaze or other problems. 


Further improvements on the bowl may be found at the rim of the bowl. My original profile had a rim that was slightly thicker at the rim, to strengthen the rim. Another concern though with bowls is lifting in and out of the oven, or microwave. Some would say to add a handle to the bowl, but traditionally a thicker rim with an outside edge allowed for lifting with gloves. This allows for a thicker rim, an embellishment on the outside of the form, and an edge to catch/hold when moving the bowl either with                                                                              gloves or without.


A second rim modification would be to add a flare on the rim, allowing for easy transport of the bowl with or without gloves. This rim could often be used as a decorative area for lettering, or other stamped or incised decoration. It can also have functional benefits for mixing bowls in that the form will catch materials not quite in the bowl. The rim can also be adapted for spouts, or folded down into the outside of the bowl for a natural area for handles.


This type of rim with the deep cut foot ring has greater presence on a table, or for other venues.